Bodging a web-controlled garage door opener with a Raspberry Pi
Now, this is definitely a bodge, but it is a working bodge, and so I am quite pleased with myself.
What I wanted: to be able to open my garage doors from my phone, so that I don’t have to carry the garage door wireless control fob with me. No third party intermediary / hosted service.
What I have got: the ability to open my garage doors from my phone.
Bits I used
I already have two garage doors, each of which has a control unit with buttons, plus 868Mhz wireless control fob.
My original plan was to add a Shelly relay to the control units, but I looked at it, and wasn’t confident enough that I could make it work. It might be possible, and it would be neater than what I have ended up with.
Instead, I resorted to remotely controlling one of the 868Mhz wireless fobs.
To do this, I used a Raspberry Pi which I had already, a Raspberry Pi relay board, a wireless fob, some wire to connect it all up, and spider’s web of software.
Connecting the hardware together
I got a new wireless fob, paired it with the control unit, and tested it. So I knew at this stage that the new control would open the doors.
I then removed the battery, took the fob apart, and soldered a wire to either side of each of the switches. Putting the battery back and touching the wires together, I got a circuit, which triggered the relevant door so, so far, so good.
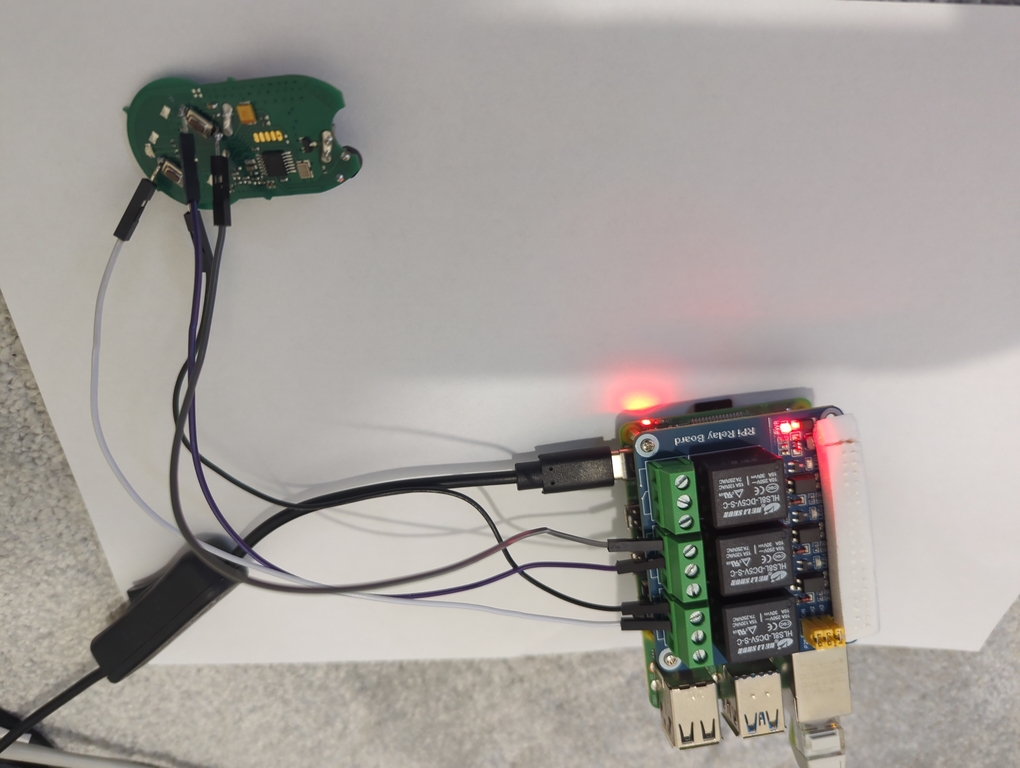
I connected the wires up to the Raspberry Pi relay board. At first, I connected them the wrong way round, so that that switch was always closed until triggered, but, by swapping the sockets, I got it so that the switch was always open (i.e. no circuit for the control) unless the relay was triggered. The documentation for the relay board is rather basic - perhaps it would be obvious to someone more experienced what to do but, for me, it was trial and error.
Software
I used the Raspberry Pi OS Lite, 64 bit. I configured / hardened it as usual, so it is pretty well locked down before I began. It is also on its own VLAN.
I did not need to install anything special on the Pi, to make the relay work. Again, the documentation for the relay board](https://www.waveshare.com/wiki/RPi_Relay_Board) is lacklustre. It looks like one must install the “related function library”, but I did not need to do so.
There are some example scripts/code, and I used the shell script variant to find my way around - nice and easy.
I created one shell script for each door, to save passing parameters around.
Each script is simple:
#! /bin/bash

## 26 for main door, 20 for bike door

echo 26 > /sys/class/gpio/export

echo out > /sys/class/gpio/gpio26/direction

echo "0" > /sys/class/gpio/gpio26/value
echo "Main door button down"

sleep 2

echo "1" > /sys/class/gpio/gpio26/value
echo "Main door button up"
I chmod +x’d it.
When run, this script just writes to the Pi’s GPIO controller filesystem, using the pinout for the channel/relay to which that particular door is connected.
It writes 0 - close the circuit - waits for two seconds with the circuit closed to simulate a button press, and then writes 1 to reopen the circuit and break it, simulating lifting off the button.
And, at this point, it worked fine via ssh. I was pretty chuffed to have got this far, to be honest.
What I wanted was to be able to push a button on my phone. Lots of very kind people in the fediverse suggested numerous different ways to achieve this, and I settled on the following. Again, perhaps a bit of a bodge, but it works.
I installed apache2 and php.
I have an index page with two forms, to create two buttons:
    <html>

        <head>

<meta name="viewport" content="width=device-width, initial-scale=1.0">

        </head>

        <body>
<form name="input" action="trigger_main_door.php">
<input type="submit" value="Main door" style="height:25%; width: 100%; background-color:darkgrey">
</form>


<form name="input" action="trigger_bike_door.php">
<input type="submit" value="Bike door" style="height:25%; width:100%; background-color:lightgrey">
</form>

        </html>

There is plenty of scope for making this prettier / more user friendly, but it works, and it is finger-friendly.
The php form handlers are also simple: it writes a file (depending on which door it is), to /var/www/html, and then returns to the main page:
 <?php

	$newURL = "http://192.168.1.1;

        $filename = '/var/www/bike_door';
        file_put_contents($filename, FILE_APPEND | LOCK_EX);
	header('Location: '.$newURL);
        ?>
At this point, I’m just using the IP address, and no https; it is on its own VLAN, which is not exposed to the outside world or our guest network, so a reasonable compromise for now.
I then have a shell script, which monitors for the presence of a file in /var/www/html and, if present, it runs the relevant door’s shell script, to simulate pressing the button, and the removes the trigger file written by the webserver.
The monitoring shell script is:
#!/bin/bash

while :
do
   if test -f "/var/www/main_door"; then
      /home/neil/main_door.sh

      rm /var/www/main_door
   fi

      if test -f "/var/www/bike_door"; then

      /home/neil/bike_door.sh

      rm /var/www/bike_door
   fi

   sleep 1
done
Again, chmod +x’d.
This shell script is managed by systemd, so that it starts on boot, and runs continuously.
The systemd config is in /lib/systemd/system/doorcontroller.service:
[Unit]
Description=Door Controller Script

[Service]
ExecStart=/home/neil/doorcontrollerscript.sh

[Install]
WantedBy=multi-user.target
After writing the file, I did sudo systemctl daemon-reload and then sudo systemctl enable --now doorcontroller.service.
And that’s it!
And it works!
So, yes, I’m quite pleased with myself. I do plenty of stuff with software, but this is the first time that I’ve soldered anything in a long time, and the first time I’ve used the Raspberry Pi’s GPIO facility ever.
Things to look into
I think I need to change the systemd script, to ensure that the shell script restarts if it somehow exits.
And I will probably stick a cheap webcam in the garage, so that I can grab an image for the control page to see the status of the doors - because I’m emulating a single button press, I don’t get feedback as to the status of the doors, nor do I have a specific command for “open” or “close”. Which is a pain, but something we live with the fobs already.
This is designed for convenience of not carrying a fob, rather than with the goal of opening it from miles away, so I’d expect to be able to eyeball the state. But, well, adding a webcam would not hurt.
Because I’m using the relay board, I can’t also - as far as I know - use the PoE HAT for the Pi. I am using to powering my Pis over ethernet, so having to have an additional plug and USB connection is a bit of a pain. But, hey, it works.
I also have no way of monitoring the battery life in the fob.
It might be nice to integrate it with Home Assistant?
You may also like:
- Fixing an array_filter() php error when using PHP 7.4 with dokuwiki's twofactor plugin
- Turning a Raspberry Pi Zero W into a travel media centre
- Home Assistant Core, Raspberry Pi OS, and python 3.10
- My home in the fediverse: Mastodon on a Raspberry Pi
- RSS as my default web browser (for some stuff)
- Running the greenbone OpenVAS vulnerability scanner on a Raspberry Pi 4
- Upgrading my .onion site to https
- Brave, Tor, and http-only .onion sites
- Browsers for people who just want a browser
- Cloning a Raspberry Pi installation: slow, but working
- The Wild West Web fallacy
- Confession time
- Raspberry Pi 4 with the PoE+ HAT: LUKS and a working fan
- Installing vanilla Debian 11 on a Raspberry Pi 4
- Running Jitsi on a Raspberry Pi 4